網站架設教學
網站架設
網站架設一點都不難,您對網站架設完全不懂,一點頭緒都沒有嗎?讓我們來幫助您,有了雷電HTTPD網站架設軟體,任何人都可以在您的電腦上成功地網站架設.
網站架設 - WEB server 軟體以及需要什麼樣的設備
在Internet上假如你有了IP以及Domain Name,接下來你您只要再安裝網站伺服器,就可以達成網站架設的夢想了。我們推薦您使用 RaidenHTTPD Web Server,因為他開發的目標為簡單易用輕鬆上手,人人皆可架設網站!
在網路環境上,建議使用寬頻的網路環境,例如固定式專線,ADSL,有線電視數據機或是區域網路等 .. 不論是固定IP或是動態IP位址都可以架設網站喔,不過若是動態IP架站您可能還需要申請專屬的網域名稱。我們建議租用固定IP.
下載免費試用版本雷電HTTPD 雷電網站架設軟體下載頁
寬頻上網申請資訊 So-net 中華電信
網域名稱申請 TWNIC (國內) Register.com (國外)
網站架設 - 如何架設網頁
網站架設 - 檢查您的架設網頁安裝環境
* 請確定您的磁碟機仍有大約20MB的剩餘空間。
* 請將雷電HTTPD WEB server及PHP安裝於C磁碟。
* 建議系統皆以實行過Windows Update確保最新版程式元件之穩定性,如果是WinXP作業系統,在我們的RaidenAdmin介面中提共您自動設定Windows Firewall的功能。
* 由於WinNT/2000/XP皆內建有IIS,佔住了Port80,而且若是您有安裝PHP,亦會鎖住PHP相關的dll檔,可以先將它關閉,方法如下:開始 程式集系統管理工具Internet服務管理員,來關閉IIS的服務,如果您找不到,請到我的電腦控制台系統管理工具Internet 服務管理。
* 若你是WindowsNT/2000/ME/98的使用者,請將IE更新到最新版本,或更新你的MSXML Parser版本(按此更新)。
* 有安裝過Apache with php 的使用者,請先停掉,以免他在執行時會佔用php4ts.dll 或 php4isapi.dll 而導致PHP4安裝失敗。
* 有安裝Skype的使用者,請進入功能->設定選項->連線->[不要打勾]使用80/443 port作為外來連線替代。
* 曾經安裝過RaidenHTTPD也請先停掉,並把桌面右下角出現在System Tray的 RaidenAdmin 也一併關閉。
* 如有安裝分享器請依照說明設定 分享器設定教學範例
* 如有安裝防火牆請依照說明設定 XP/2003/Vista內建防火牆,諾頓Norton Antivirus/Internet Security,Pc-cillin Internet Security
網站架設 - 快速安裝架站教學
如何架設網頁 - 快速安裝架站教學
安裝程式下載完畢之後(RaidenHTTPD.exe/PHP4 或 RaidenHTTPD_PHP5.exe/PHP5),隨後使用檔案總管執行它,按照步驟作即可快速安裝。
步驟一:選擇安裝介面的語言。
步驟二:首先您必須接受使用者授權合約,點選"我同意"。
步驟三:選擇您想要安裝的套件,建議選擇Full模式,將PHP-4.x.x(或5.x.x)一併安裝,安裝程式會將PHP強制安裝在C:/php/ 之下,並點選Next。
步驟四:可點選瀏覽選擇安裝路徑,確定資料夾位置後點選"安裝"。目前僅支援C磁碟安裝。
步驟五:開始自動安裝,結束後請點選結束。
--------------------------------------------------------------------------------
接下來開始第一次的基本設定網站架設軟體教學
步驟一:設定說明,請直接點選下一步。
步驟二:設定網站伺服器IP及埠號,檢查PHP處理器的位置設定,建議您採用預設值,接下來點選下一步。
步驟三:設定網站的根目錄也就是放置網頁的地方,請點選瀏覽,選擇本機路徑位置,並按下確定。
步驟四:虛擬主機的其他設定,建議採用預設值即可,請點選下一步。
步驟五:若要雷電HTTPD網站架設軟體隨著系統啟動,必須安裝系統服務,請先檢查是否有其他的Web Server已經被安裝且必須被停止服務,然後再依照 1.安裝 2.啟動 的順序設定雷電HTTPD。
步驟六:恭喜您~完成網站架設的基本設定囉!網站架設成功!
系統工作列上將會出現雷電HTTPD的圖示
以滑鼠左鍵雙擊它將會出現雷電HTTPD歡迎中心
或是以滑鼠右鍵點擊雷電HTTPD工作列圖示將會出現功能選單
網站架設教學 - 如何開啟自己的WWW網站
網站架設教學 - 如何開啟自己的WWW架設網頁
用瀏覽器開啟您個人網址,注意若要讓全世界的網友來上你架設的網站,必須要告訴他們你的WAN IP(真實IP位置),而非NAT分享器後的虛擬IP位址。(但您自己在網內時有可能只能連上您的虛擬IP位址)
2009年9月3日 星期四
FTP software - RaidenFTPD
FTP software - RaidenFTPD
FTP software - RaidenFTPD is an easy-to-use FTP software daemon for Windows. With this handy FTP Server tool you can share your files with friends, provide file download services to customers or even setup your own home network FTP software server. Not only are all the basic FTP features built-in; it also features various advanced features such as SSL/TLS, UTF8(unicode), UPnP NAT traversal and more ..
FTP software - RaidenFTPD server software
FTP server software RaidenFTPD is an easy-to-use ftp server software for Windows™. With this handy tool you can share your files with friends, provide file download services to customers or even setup your own private network file server.
FTP software - Client and Server architecture
If someone is talking about an FTP software, he is probably talking about an FTP client or an FTP server, FTP is file transfer protocol and it can not work with only a client or a server software, to choose what you really need, you need to understand that are you going to do, If you want to download or upload somthing from an FTP site, you need an FTP client software, if you want to host files for people to download or upload, You need an FTP server software.
FTP software - SmartFTP client software
FTP client software SmartFTP is an FTP software (File Transfer Protocol) client which allows you to transfer files between your local computer and a server on the Internet.
mp3 jukebox software | music server
2009年7月7日 星期二
How to setup an FTP server step-by-step guide
Step 1: download FTP server software |
The first step is to download an FTP server software for Windows operating system, we recommend you the RaidenFTPD FTP server software.
Download the software (raidenftpd2.exe) and open it to launch the setup procedure, just click I agree and next next and next to finish the setup program.
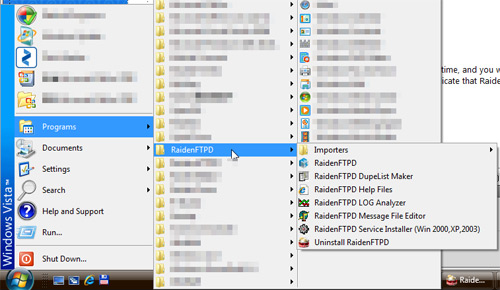
After it is installed, you will see an RaidenFTPD icon on your desktop
And a program group called RaidenFTPD under your start menu
And the RaidenFTPD program will also be opened automatically for the first time, and you will notice that there will also be an icon on your task bar notification area to indicate that RaidenFTPD program is now running.
|


Step 2: configure the FTP server software | |
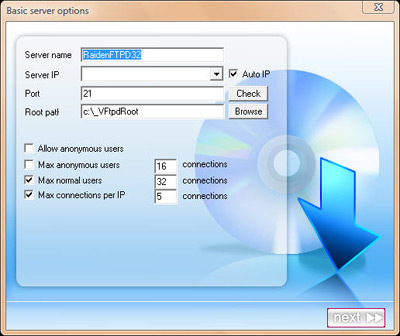
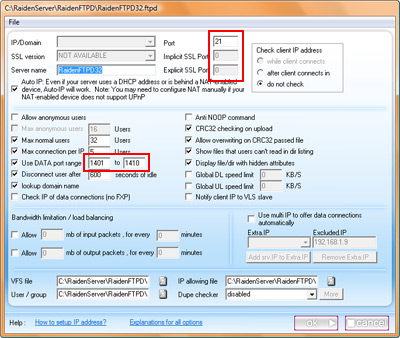
After you install and start the RaidenFTPD FTP server software, the first thing to do is to start up your FTP server, there are some basic things you need to know before you do it. 1. You need to specifiy a port number for FTP server to listen on, it's usually 21. Now we can start to configure the FTP server
Specify a server name, anything you like. Specify IP,PORT,ROOT path and click next. In the second step you don't need to change anything and click next. In the last step click ok and it's done. | |
Step 3: Create the 1st user account | |
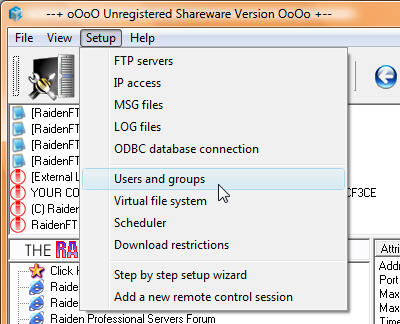
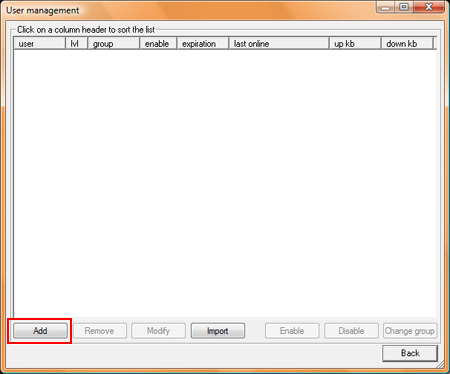
The key point to setup an FTP server in Windows is to have named accounts, when creating an FTP user account on your RaidenFTPD ftp server software, and the following information will automatically be generated and copied to your system clip board. You can launch batch users manager by clicking this icon or the menu >> setup >> users
And groups. And it is automatically opened when your first server is started.
click Add to create an user account. just enter the user name/pass, specify its user leve, and if it should be using server's VFS structure or not. finally when it finishes, the following information will be copied to clipboard.
Now that you are an FTP site master, please forward the above information to your ftp client users, your users will be able to use Internet explorer to connect to your FTP server by the aboe direct IE url or using a professional FTP client such as CuteFTP Pro. | |
Step 4: Configure Firewall for FTP server | |
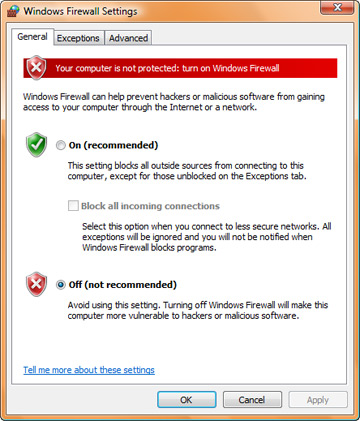
The difficult part for setting up an FTP server is not running the software itself, it is how to confgure the firewall software for FTP access. Most of the people maybe already using Windows XP/Vista built in firewall, RaidenFTPD FTP server can configure it automatically for you, however this Windows Firewall got a nasty problem that is the PASV port redirection. PASV port redirection: FTP server software uses 1401-1410 ports for passive modes, you need to open them on your firewall software and make port forwarding on Routers. however Windows Firewall makes changes to those ports, for example the server listens on 1401 and the Windows Firewall will intercept it and change it to something like 5005 so what ever you map on your router will never be mapped. that simply means the port mapping on your router will not work. To make long story short, DISABLE WINDOWS FIREWALL IF YOU ARE RUNNING FTP SERVER BEHIND A ROUTER. Start menu >> settings >> control panel >> security >> windows firewall >> change settings.
To manually setup other kind of Firewall softwares, open the following TCP ports: 21,1401-1410 and trust the executable file raidenftpd.exe (usually under c:\RaidenServers\RaidenFTPD)
There are too many kinds of Firewall softwares so we only list one as an example, but just remember the rules and it applies to all kinds of firewalls. | |
Step 5: How to configure broadband router for external accesses to the FTP server | |
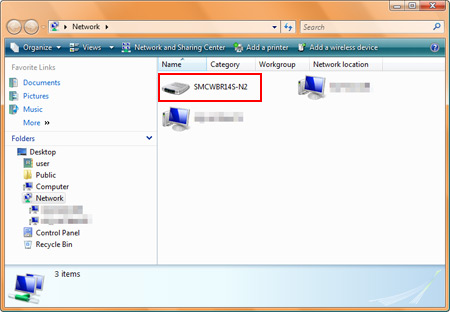
After the firewall is configured, you should be able to connect to your FTP server from any computer in the same network (probably behind the same broadband router or hub). But before you configure the router, users on the internet still can not connect to your FTP server. Before we proceed we have a little knowledge to tell you. the PRIVATE IP-Address and WAN IP-Address. PRIVATE IP-Address: all computers connect to the internet via a broadband router (usually called NAT) may be assigned with a PRIVATE IP-Address, private IP-Address is used only locally and privately, it is not accessible from the internet, only computers on the same hub or router can access to each other with a private IP address. it is usually something like the following: 10.0.0.0 - 10.255.255.255 (10/8 prefix) WAN IP-Address: WAN IP-Address is given by your ISP, it is accessible from worldwide, usually it is used on your broadband router exclusively, but not the computers behind it. so You have to configure and tell the router about how to do the redirection so the server running on internal computer is accessible from internet. Now you understand that you need to configure the router but how? it's simple, just lookup the private IP address of the PC that has the FTP server running, and connect to your router by web browser, login its administration interface, add port mapping (a.k.a. port forwarding or virtual server) for the following ports 21,1401-1410 and map them to your private IP-Address. By the way, if you are using Windows Vista, it MAY find your router automatically (not guaranteed!), so just check open NETWORK on your desktop and if you find your router's model name in the NETWORK, just double click on it and the router's administration interface maybe opened. (if you are lucky enough).
here is an example for Linksys router | |
Step 6: Test your FTP server | |
After you installed it, configured the Firewall, configured the router, you should be able to connect to your FTP server from home network by using your private IP-address or connect to your FTP server from outside of the router using your wan IP-address. You can use Internet explorer to test the connect, the url should be ftp://USER:PASS@YOUR_IP_ADDRESS:PORT/ Or it's better to use a FTP client to connect to your FTP server, it's more convenient and powerful. Once you have your FTP server working, you maybe interested in setting up other kinds of internet servers, we recommend RaidenHTTPD web server and RaidenTunes streaming server. |
2009年5月12日 星期二
ecshop購物車系統架設
| ECSHOP購物車系統軟體 | |||||||||
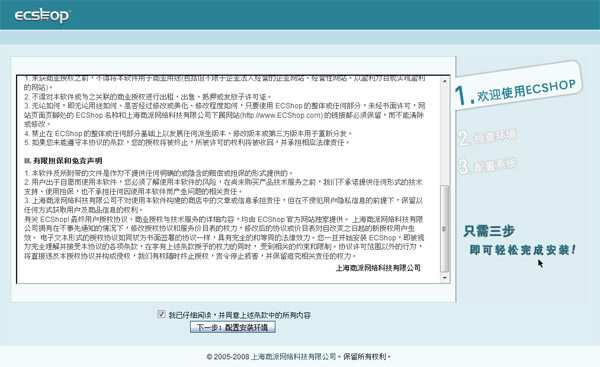
ECSHOP購物車系統ECSHOP購物車軟體是上海商派網路科技有限公司所研發的一套網路商店系統,在台灣又俗稱"購物車",以下是這套軟體的特色。 免費 + 開源 ECSHOP是一款開源免費的網上商店系統(購物車)。由專業的開發團隊升級維護,為您提供及時高效的技術支援,您還可以根據自己的商務特徵對ECSHOP進行定制,增加自己商城的特色功能。 強大 + 簡便 ECSHOP除了注重功能上的強大以外更重要的特點就是操作上的方便快捷。我們設身處地為用戶著想的設計理念使我們的產品達到了極高的易用性。只需輕點滑鼠+簡單錄入即可完成商城管理。 效率 + 速度 ECSHOP在系統架構,資料庫,程式等方面的設計都由資深的專業人士完成,保證了系統的健壯和效率,高效合理的管理流程助您在瞬息萬變的商務活動中始終領先一步,掌握市場的主動權。 參考網址 ECSHOP購物車系統網站 | ECSHOP最新版下載帖 購物車軟體下載要架設ECSHOP購物車軟體,我們首先要備妥安裝環境,你必須要有一個WEB Server與資料庫MySQL Server軟體安裝好。請依下列教學分別安裝好雷電HTTPD與MySQL 5.0x軟體。 網站架設教學(RaidenHTTPD) 備妥上述環境後,您可以開始下載ECSHOP購物車軟體,截稿前最新版為2.6.2,請下載UTF8版本以支援Unicode。 注意: ECSHOP購物車軟體為個人使用時免費,商業用途須購買商業授權。 開始安裝ECSHOP購物車系統下載完畢後,你會得到一個ECShop_V2.6.2_UTF8_Release0326.rar的壓縮檔,你可使用WinRAR軟體把這壓縮檔案解壓縮到你的網站根目錄之下的一個ecshop子目錄。如同下列的架構。
解壓縮完畢後您可以透過以下的網址進行安裝流程,比如說你的伺服器IP為 127.0.0.1 那麼就是利用這樣的網址: 您可利用 Internet Explorer 或是 Firefox 之類的瀏覽器來開啟購物車系統安裝畫面。
按下一步
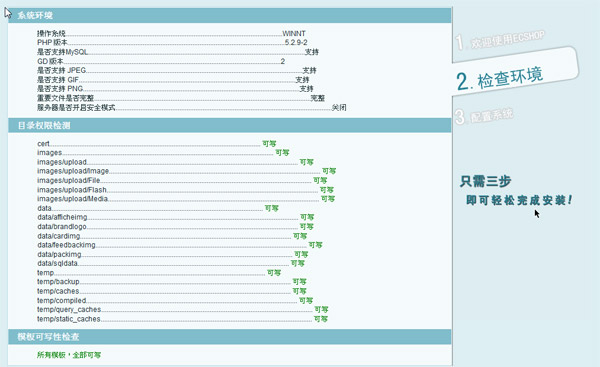
這畫面請仔細檢查各項需求是否能通過,如果一開始灌的是雷電HTTPD PHP5版以及MySQL5應該可以順利通過測試
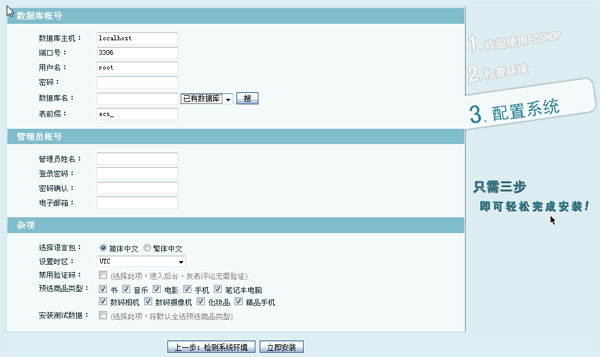
如果你已經照著我們的教學灌完 MySQL 5.0 那麼以下的資訊你應該已經有了 数据库主机: 通常為 localhost 或是資料庫主機的 ip 位置 管理员姓名: 自選
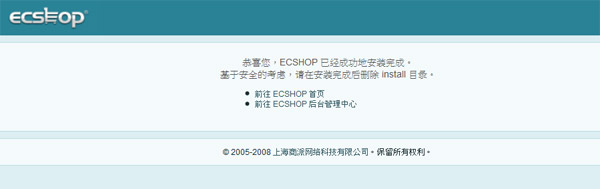
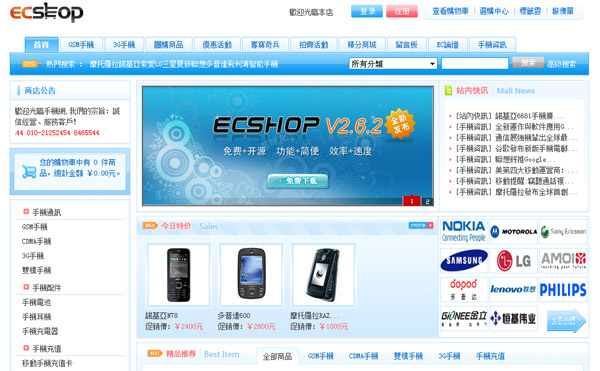
出現這畫面表示成功了,現在請前往首頁看看
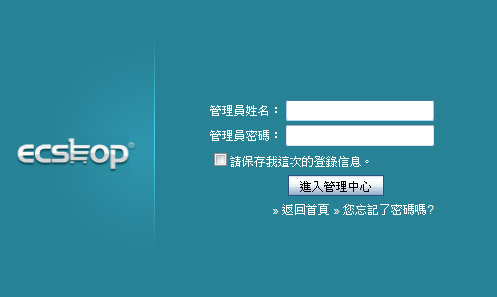
出現了預設的首頁 趕快將您的自有商品上架吧 接下來要進入購物車的管理區做一些基本的設定 管理區的網址是你的商店網址 + admin 例如 http://127.0.0.1/ecshop/admin/
這邊輸入你的管理者帳號密碼
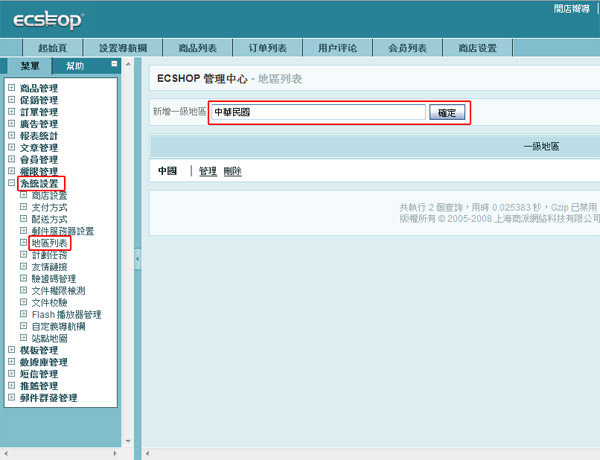
登入後要設定一些基本選項,比較重要的是要注意支付方式及配送方式請選擇您所在地有支援的方法。 購物車軟體架設,是不是很簡單呢?接下來就要靠您慢慢摸索,自由發揮了喔。 購物車系統要上線,通常都要經過一番調校,以下我們示範一些比較常見的調整。首先,您可能會想要新增一個一級地區以適應當地的習慣。
新增之後可以按下管理,然後再新增二級地區。
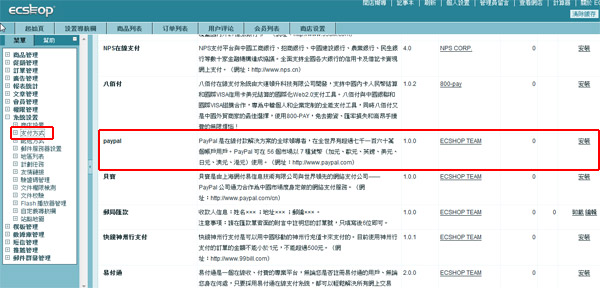
購物車系統最重要的一環,線上付款機制,您可使用在全球都可通用的PayPal
按下安裝後記得要設定您的PAYPAL帳號 接下來是所有玩家一定會問的殺手級問題:那個人民幣符號要怎麼換掉阿?你找遍設定檔也找不到的,原來它藏在資料庫裡面 在 ecshop 資料庫中-ecs_shop_config 資料表 - 搜尋 code = currency_format 這筆資料將 ¥%s元 改為 NT%s元 這樣子就可以了。 改完了還是無效?原來是要清除緩存!
|


2009年5月8日 星期五
PS3收聽線上音樂的最佳拍檔 - RaidenTunes
PS3也可以收聽線上音樂
雷電隨地聽自2.0版起新增PS3(PlayStation3 NetFront Browser)的支援,我們透過Adobe Flash9的技術克服萬難始能支援PS3的線上音樂播放.
首先要簡單介紹這套軟體到底是什麼東東,簡單來說就是您找一台Windows PC,裡面的硬碟裡有您收藏的音樂(MP3..WMA..等等),利用這套RaidenTunes的線上音樂架站軟體之後,您就可以架設起一個自家用的線上音樂伺服器,您不但可以透過Windows,MAC或是Linux上的各種瀏覽器直接上站瀏覽,搜尋,收聽您的線上音樂,最重要的是,也是今天介紹這個功能的原因 “您可以用PlayStation3內建的瀏覽器” 來收聽線上音樂.
首先,您要下載並安裝這套軟體到您的Windows PC,詳細方式就不說明了直接參考這篇教學(很簡單,幾分鐘就可以完成)
免費試用下載: http://www.raidentunes.com/download.html
安裝教學: http://www.raidentunes.com/manual-setup.html
安裝完畢後,您要先搞清楚您的RaidenTunes網站的網址,由以下兩個步驟可以得知位置為 例如 http://192.168.1.181:81/ 這樣的東西,然後記得申請第一個帳號(將成為您的管理者帳號,就可以登入了). 登入後就是新增歌曲,這幾個步驟建議在PC安裝時就先行完成.
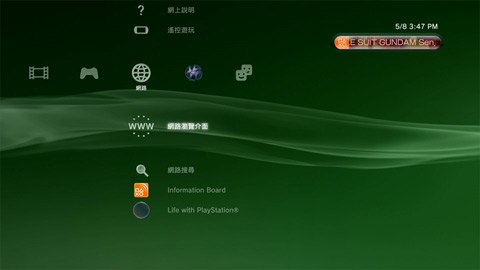
接下來就準備使用PlayStation3來享受美妙的音樂了,首先打開PlayStation3的電源,進入選單 XMB 的 網路 –> 網路瀏覽介面
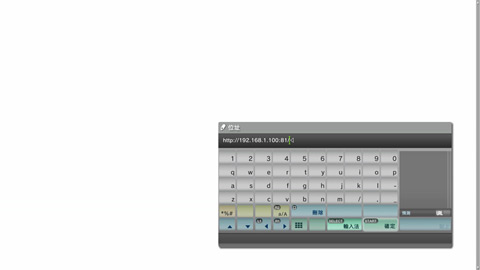
然後按三角形按鈕後->檔案->輸入位址,在這裡輸入您的RaidenTunes網址後按下確定即可.
開始連線後若出現登入畫面,就表示已經連上,在此處可先將畫面切換為全螢幕(三角形 -> 顯示 -> 最大).
登入之後首先見到的就是歡迎畫面.
PS3的瀏覽器實際畫面
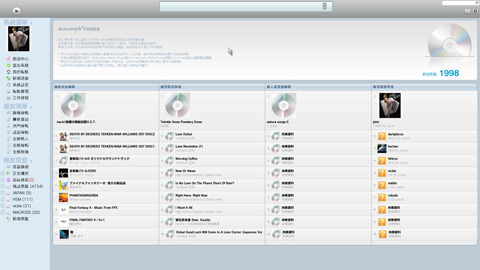
來看看線上音樂伺服器上面有什麼音樂? 點選左方選單 隨機專輯 看看.
看到了,電腦裡面有的音樂都跑出來了(當然是預先設定好音樂目錄的內容,並不會將您的硬碟洩漏光光,請放心).這邊是以專輯的方式來呈現,如果您要收聽一整張專輯或是多張專輯,只要在旁邊的勾勾上勾選,再到左上方的播放按鈕按下去即可.
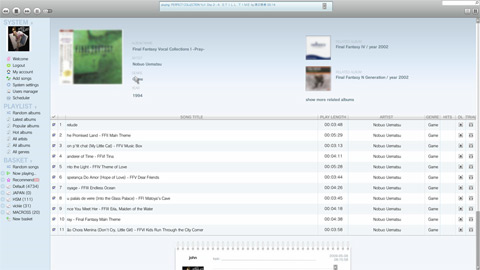
如果您對某張專輯有興趣,直接對著專輯封面圖式按下圈鈕,就進到專輯詳細介紹畫面,這裡可以看到曲目,相關專輯等等資訊.甚至如果是個有心的站長,您還可以去輸入藝人與專輯的相關資訊喔,如果是西洋的藝人,您更可以去申請一組 nytimes api key,之後就會自動抓取相關藝人的最新新聞登在版面上.
在詳細專輯的畫面,一樣是把喜歡聽的歌曲勾選起來之後,按左上角的播放鈕即可做整批播放.
對了,除了隨機專輯,最新專輯,隨著這個系統的用戶的收聽行為的變化,還會產生類似排行榜最受歡迎歌曲之類的資訊.
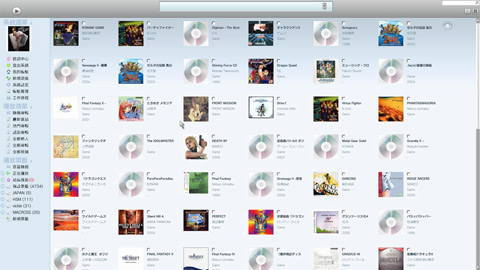
還可以一次列出站上所有的專輯,藝人,歌曲類別等資訊,方便你大量選歌瀏覽.

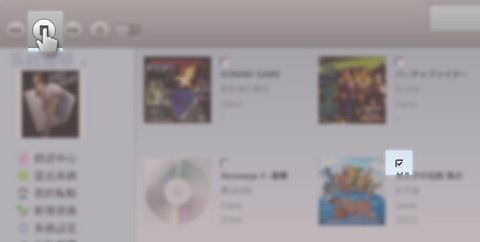
畫面中只要看到勾勾的時候,如果在左下方的菜籃處移動游標,就會出現加入菜籃的圖案,你可以建立及管理你自己喜歡的歌曲撥放清單喔.
是不是很方便呢.我們特別研發了支援PlayStation3的播放介面與版本,看似簡單,其實很辛苦,甚至一度還將PlayStation3輕鬆搞到死當.希望這個軟體對您有所幫助,感謝收看.
訂閱:
文章 (Atom)